


You Will Need:
- Two contrasting fabrics
- Webbing
- Ribbon
- Sew on Velcro
- Pins
- Measuring tape
- Chalk
- Scissors
- Sewing Machine

Step 1:
Measure and cut two squares, one measuring 8.5” x 7.5” and another measuring 8.5” x 8.5” - these will be the liners of your crackers. Repeat with your contrasting fabric.

Step 2:
Now you will need to cut out your webbing - ensure you’re using strong webbing, approximately 2.5 inches deep. Cut two lengths measuring 7.5 inches and two lengths which are 6.5 inches long.

Step 3:
Take the larger piece of your lining fabric and place right side down on your workstation. Now take your larger webbing pieces and pin to one edge of the fabric leaving a 0.5-inch gap from the bottom and sides and the other leaving a 3-inch gap from the edge of the lining fabric. Using the sewing machine stitch on each end to secure the webbing in place.

Step 4:
Next you need to decorate the outside of your cracker. Line up your lining piece to your outer piece so you can see which part the decoration will be seen when complete. We have chosen to decorate ours with ribbon. If you’re doing the same, cut two lengths of ribbon to match the width of the fabric, pin and sewing in place.

Step 5:
Now that you have secured your decoration to your outer fabric you need to attach the liner to the face piece. Place your right sides together ensuring the webbing is in line with your ribbon or decoration.
Pin along all three sides leaving the side which has the 3-inch gap from the webbing to the fabric edge. Using your sewing machine sew these three sides. Once sewn, clip the corners and turn the right side out.

Step 6:
Now that your cracker is turned the right way around you need to neaten the raw edge by turning the sides in to pin and sew. Next, measure the Velcro, we have used stick on Velcro but, sew on Velcro is also fine. Cut the Velcro down the middle to make it narrower and stick on the inside top side of your fabric so it sticks to the lining.

Step 7:
Now that you have the Velcro in place you can fold around to create the cracker shape. Hold in place with pins or clips and then hand sew these together to form the tube.

Step 8:
Repeat all the steps for the smaller pieces ensuring that the webbing and decorative ribbon is far enough down from the fabric. Next, take your Velcro and cut down the middle to make it narrow. Before neatening the edges of this piece, you can add your Velcro. Sew in place using a sewing machine.

Step 9:
Now your Velcro is secured you need to fold it over to create the tube to pin and hand sew in place. Test your cracker by ensuring the inner sides lock neatly into each other. Hand stitch along the top of your second cracker piece.

Step 10:
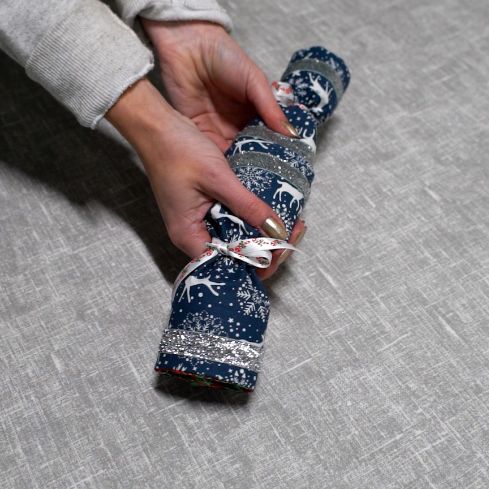
Your fabric Christmas crackers are nearly complete, all is left to do is decorate! We’ve chosen to add a contrasting ribbon to tie the edges. Cut to size ensuring its long enough to create a knot or bow.
Your fabric Christmas cracker is now complete so fill with your favourite treats and bring out year after year.