


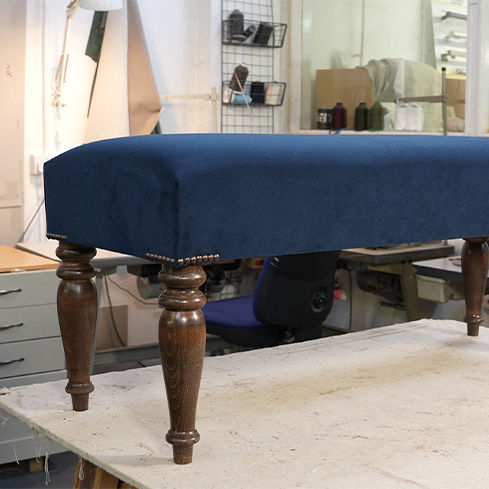

What You Will Need
For this step by step guide you will need:
- Fabric
- Scissors
- Tape Measure
- Stapler or upholstery tacks & hammer
- Decorative upholstery nails
- Pencil
- 4 ounce polyester wadding
- Ruler
- Tailors chalk
- Pincers
- Staple lifter

Step 1
To start, you need to take off the old fabric and wadding. Using a pair of pincers and a staple lifter, work your way around the footstool until all of the old fabric and wadding has been removed.

Step 2
Lay your polyester wadding over the footstool. Make sure theres enough to come round under the edge of the frame on the all sides.

Step 3
Trim away the excess polyester wadding and make sure there it's clear of the legs as this will help keep a neat finish around them.

Step 4
Next, use your cloth tape measure to measure for the new fabric that will be used to cover the footstool. Measure the length and width, starting and ending right under the footstool so there's more fabric to pull on when it comes to tacking the fabric down. Around 2 inches of extra fabric on each side will ensure there's enough.

Step 5
Using tailors chalk and a ruler, mark out your measurements on your fabric and then cut it out.

Step 6
When the fabrics been cut, fold the fabric in half length ways and then do a small cut on the middle fold on both sides to mark the centre point. Repeat this again but with the fabric folded width ways.

Step 7
Next, turn the footstool upside down and mark the halfway point on each of the 4 sides.

Step 8
Now, flip the footstool back over and lay the fabric over the footstool. Line up the small cuts on each side of the fabric with the pencil marks on the frame of the footstool.

Step 9
Next, it's time to start temporary tacking the fabric into place. With the footstool on its side, put a tack into the centre point on one long edge. Working outwards from the centre point, put a few more tacks in along that edge.

Step 10
Repeat the last step with the other long edge. This time though, use one hand to add some tension to the fabric and the other to smooth out the fabric by running it upwards along the top side of the footstool.
Repeat this on the ends of the footstool too.

Step 11
When you're happy with the placement of the fabric and it's been temporary tacked in place, go back to the first side you started on and remove the first middle tack. Using the same technique from the last step, add tension and smooth the fabric out. Put in a final tack to hold this in place.
Repeat this on all sides until the fabric has been fully fixed in place.

Step 12
Now it's time to start on the corners. Pull the fabric downwards and towards the long side of the footstool, making sure it's tight around the corner and then put a temporary tack in to hold it in place.

Step 13
Next, cut the fabric across the leg on the end of the footstool, stopping short of the edge of the leg.
Now you'll be able to fold your fabric under on the short edge and fix it into place.

Step 14
Now, remove the temporary tack you put on the edge of the footstool and cut away some of the fabric thats overhanging the leg.

Step 15
Turn the remaining fabric in and line it up around the corner of the footstool. Put staples along the bottom edge and on the side to hold this in place.

Step 16
Now it's time to form the corner pleat. Firslty, remove some of the excess fabric and fold it over to form the pleat.

Step 17
Then, cut across the leg on the long side of the footstool to as this will let you turn the fabric pieces under the footstool. Secure this in place with a few tacks.

Step 18
To finish the corner, cut away some more excess fabric and turn the fabric underneath itself to form the pleat. Put in a temporary tack to hold this in place as we'll use the decorative nails later in the guide to secure it further.
Repeat all these steps with the other corners of the footstool.

Step 19
Now it's time to add some decorative nails to the corners to create a nice finish. Simply hammer one in half way, remove the temporary tack from before and then hammer the nail in all the way. Add as many nails as you like and do this on all the corners of the footstool.

Step 20
Next, it's time to measure for the bottom cloth. Measure the length and the width of the bottom of the footstool, giving yourself a little bit extra to work with on each.
Cut out your bottom cloth to the sizes you measured above using tailors chalk, a ruler and scissors.

Step 21
Before the bottom cloth goes on, trim the excess main fabric on the underside of the footstool.

Step 22
Position the bottom cloth on the footstool with plenty hanging over each side. Then, fold the bottom cloth inwards on one of the long edges and tack in the centre to hold it in place. Working outwards, tack the side into place and repeat on the other long edge whislt putting some tension on the fabric.

Step 23
Moving onto the ends of the footstool, repeat the previous step to secure the fabric into place.

Step 24
Now it's time to cut the base cloth for the legs. Cut diagonally towards the leg to allow the fabric to form around it. Cut away the excess to help it look neater. Put some staples along the long edge to secure the fabric.

Step 25
Finally, trim away the last bit of excess cloth and fold it under. Staple it to hold it in place and repeat the last few steps with all the corners of the footstool.